In last C# tutorials we learned to bind Gridview with SQL datasource in code behind. In previous article, we explained what is asp.net Gridview? And why we need it?
Now, in this article we are going to learn in simple way to update, delete and insert in Gridview using C#.net & framework 4.0.
We are taking here the example of "Northwind" database which comes with SQL server 2005. In this asp.net gridview example we would perform operations like insert, update and delete on this table thru Gridview.
Following articles might be of your interest
Now, in this article we are going to learn in simple way to update, delete and insert in Gridview using C#.net & framework 4.0.
We are taking here the example of "Northwind" database which comes with SQL server 2005. In this asp.net gridview example we would perform operations like insert, update and delete on this table thru Gridview.
Steps to update delete insert in Gridview in C#.net
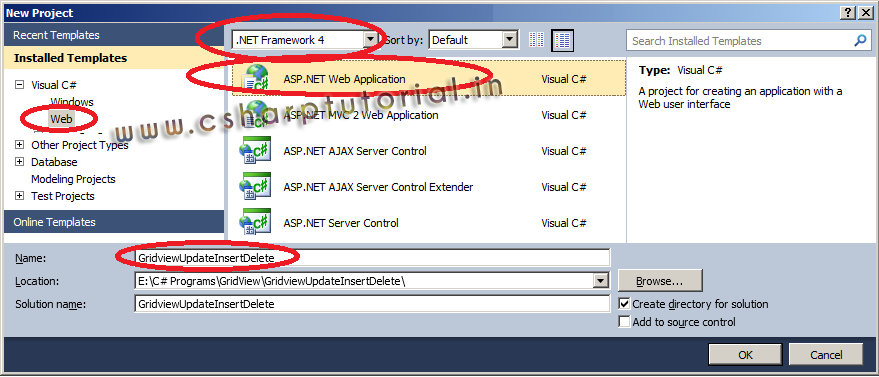
- Create a new web application and name it "GridviewUpdateInsertDelete". Select .Net Framework 4.0 as shown in below image and click on "Ok" button.
![Gridview - Create a new web application Gridview - Create a new web application]()
Gridview - Create a new web application - It would open "Default.aspx" in Source mode. Click on "Design" as shown below.
![Gridview - Selecting design mode Gridview - Selecting design mode]()
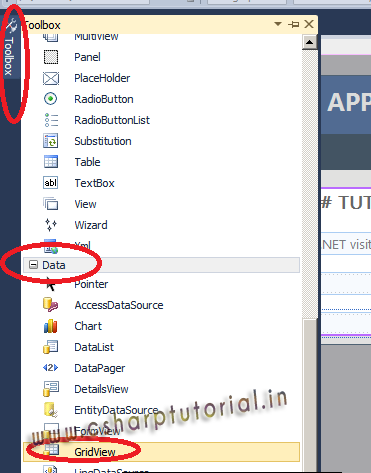
Gridview - Selecting design mode - Now, take Gridview control on your page. To take GridView control on your page click on "Toolbox" and drag & drop GridView to your page.
![Gridview - Adding asp.net gridview Gridview - Adding asp.net gridview]()
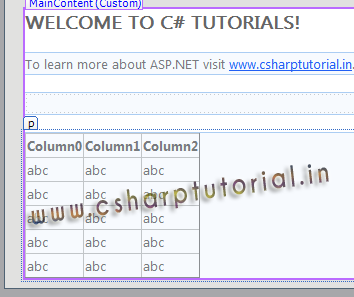
Gridview - Adding asp.net gridview - Once you place aspx GridView control on your page, it would look like below screenshot.
![Gridview on a aspx page Gridview on a aspx page]()
Gridview on a aspx page - Change the name property of asp gridview from "Gridview1" to "grdEmployee". You can change the name of the gridview thru Properties window.
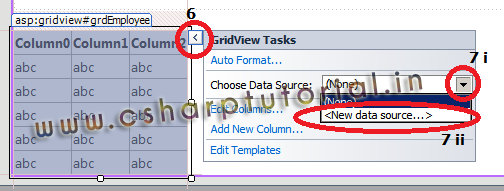
- Now it’s time to bind some datasource to Gridview to show data on Gridview. To accomplish this, click on Gridview and then click on link button as shown in below image.
![Gridview - Link button to add properties Gridview - Link button to add properties]()
Gridview - Link button to add properties - It would open "Gridview task" window.
- Click on dropdown button of "Choose Data Source".
- And select "New Data Source".
![Gridview - Select SqlDataSource at design time. Gridview - Select SqlDataSource at design time.]()
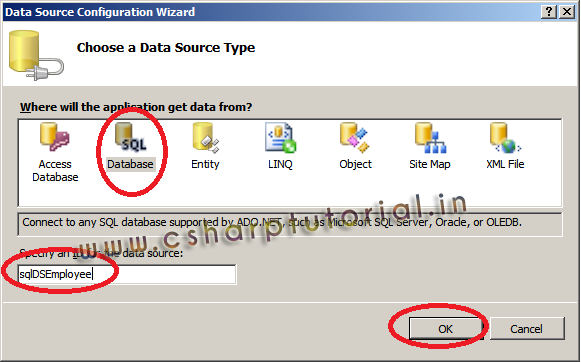
Gridview - Select SqlDataSource at design time. - It would open a "Data Source Configuration Wizard" to select a datasource. Click on "Database" and specify name of the datasource as "sqlDSEmployee" and click on "ok" button.
![Gridview - Select SQL Database to bind with Gridview Gridview - Select SQL Database to bind with Gridview]()
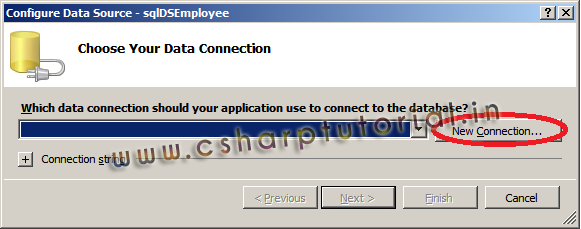
Gridview - Select SQL Database to bind with Gridview - Click on "New Connection".
![Gridview - SQL datasource connectionstring Gridview - SQL datasource connectionstring]()
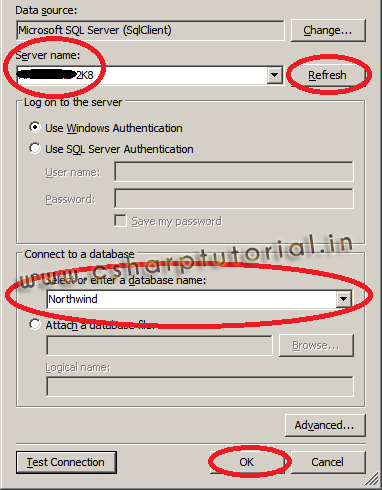
Gridview - SQL datasource connectionstring - Enter your server name and click on "Refresh" button. Now select your "Database" name and click on "Ok" button.
![Gridview - Select Database Gridview - Select Database]()
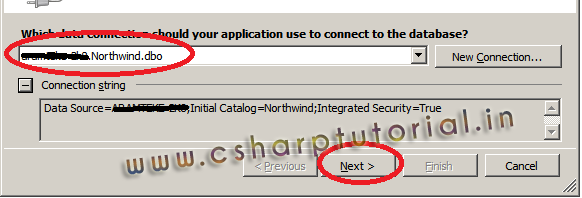
Gridview - Select Database - It would show the connection string details. Verify and click on "Next" button.
![Gridview - Connection string Gridview - Connection string]()
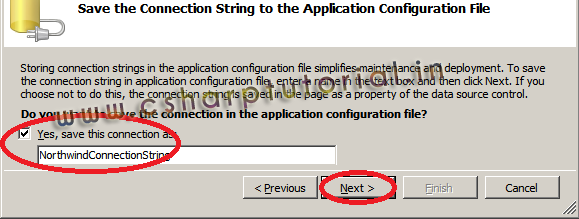
Gridview - Connection string - Save the connection string and click on "Next" button.
![Gridview - Save Connection string Gridview - Save Connection string]()
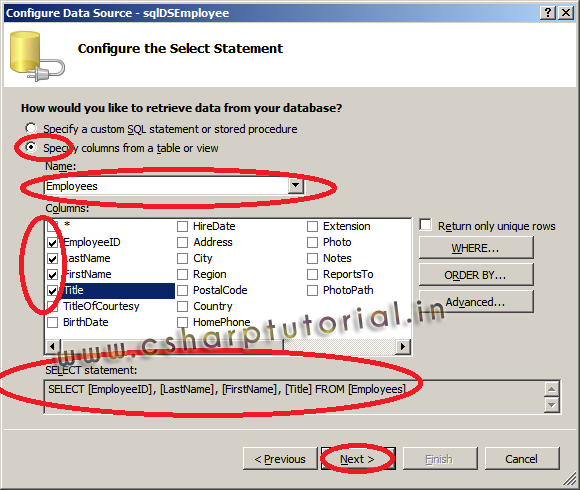
Gridview - Save Connection string - Now we need to select the database Table from which we need to retrieve the data. Select "Employee" table and select fields like "LastName", "FirstName" and "Title". And click on "Next" button.
![Gridview -Select table and table columns Gridview -Select table and table columns]()
Gridview -Select table and table columns - Click on "Finish" button.
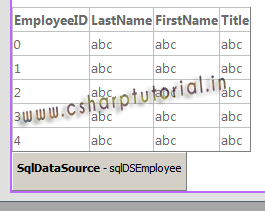
- Now your Gridview would look like below image.
![Gridview - bind with SQLdatasource in design time Gridview - bind with SQLdatasource in design time]()
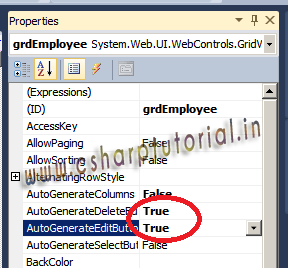
Gridview - bind with SQLdatasource in design time - We are done with database connection. Now the next steps are related to insert, update and delete in Gridview in asp.net. Click on Gridview control and open properties window. Change the values of "AutoGenerateDeleteButton" and "AutoGenerateEditButton" properties to "True" as shown in below image. It would add "Edit" and "Cancel" link buttons on your gridview.
![Gridview Properties - AutoGenerateDeleteButton & AutoGenerateEditButton Gridview Properties - AutoGenerateDeleteButton & AutoGenerateEditButton set to true]()
Gridview Properties - AutoGenerateDeleteButton & AutoGenerateEditButton - We are half done with gridview edit and update. To make it complete, we need to add "Update" and "Delete" commands in SQLDatasource in source window. Go to "Source" and add below lines under "asp:SqlDataSource" tag. So the final complete source code of "asp:SqlDataSource" tag would look like -UpdateCommand="UPDATE [Employees] Set [LastName]=@LastName, [FirstName]=@FirstName, [Title]=@Title Where [EmployeeID]=@EmployeeID"DeleteCommand="DELETE FROM [Employees] Where [EmployeeID]=@EmployeeID"Above source code includes all three command i.e gridview edit command, gridview update command and gridview delete command.<asp:SqlDataSourceID="sqlDSEmployee"runat="server"ConnectionString="<%$ ConnectionStrings:NorthwindConnectionString %>"SelectCommand="SELECT [EmployeeID], [LastName], [FirstName], [Title] FROM [Employees]"UpdateCommand="UPDATE [Employees] Set [LastName]=@LastName, [FirstName]=@FirstName, [Title]=@Title Where [EmployeeID]=@EmployeeID"DeleteCommand="DELETE FROM [Employees] Where [EmployeeID]=@EmployeeID"></asp:SqlDataSource>
- Now we are done with Insert and Update in GridView in C#.net. The only part left is now Insertion. To insert a new record we need to place some textboxes and label to accept LastName, FirstName and Title to insert into the gridview. Place four labels and three textboxes and name them as shown in below image.
![Gridview - Adding labels and textboxes to add record. Gridview - Adding labels and textboxes to add record.]()
Gridview - Adding labels and textboxes to add record.
The source code to add above button, 4 labels and 3 textboxes is given below. You can use below source code.<p><asp:ButtonID="btnInsert"runat="server"OnClick="btnInsert_Click"Text="Add New"/></p><p><asp:LabelID="lblLastName"runat="server"Text="Last Name"></asp:Label> <asp:TextBoxID="txtLastName"runat="server"Width="260px"Enabled="False"MaxLength="20"></asp:TextBox> <asp:LabelID="lblFirstName"runat="server"Text="First Name"></asp:Label> <asp:TextBoxID="txtFirstName"runat="server"Width="135px"Enabled="False"MaxLength="10"></asp:TextBox> <asp:LabelID="lblTitle"runat="server"Text="Title"></asp:Label> <asp:TextBoxID="txtTitle"runat="server"Width="270px"Enabled="False"MaxLength="30"></asp:TextBox></p><p><asp:LabelID="lblError"runat="server"ForeColor="Red"></asp:Label></p> - Now double click on "Add New" button. It would open a "Default.aspx.cs" file with btnInsert_Click event. Enter below code in this event. protectedvoid btnInsert_Click(object sender, EventArgs e){// If Button.Text = Add new then Enable all three textboxes.if (btnInsert.Text.Equals("Add New")){txtLastName.Enabled = true;txtFirstName.Enabled = true;txtTitle.Enabled = true;// Change the text of button to "Insert".btnInsert.Text = "Insert";}elseif (btnInsert.Text.Equals("Insert")){// If any of the textbox is empty then show error to enter into all three boxes.if (txtLastName.Text.Equals(string.Empty) || txtFirstName.Text.Equals(string.Empty) || txtTitle.Text.Equals(string.Empty)){lblError.Text = "Please enter values for Last Name, First Name and Title fields.";}else{// Insert commandsqlDSEmployee.InsertCommand = string.Format("INSERT INTO [Employees] ([LastName], [FirstName], [Title]) VALUES ('{0}', '{1}', '{2}')", txtLastName.Text, txtFirstName.Text, txtTitle.Text);sqlDSEmployee.Insert();// Bind the data to GridViewgrdEmployee.DataBind();//Disable all textboxes.txtLastName.Enabled = false;txtFirstName.Enabled = false;txtTitle.Enabled = false;//Remove the contents of textboxes.txtLastName.Text = string.Empty;txtFirstName.Text = string.Empty;txtTitle.Text = string.Empty;//Remove error if any and change the button.Text = "Add New"lblError.Text = string.Empty;btnInsert.Text = "Add New";}}}
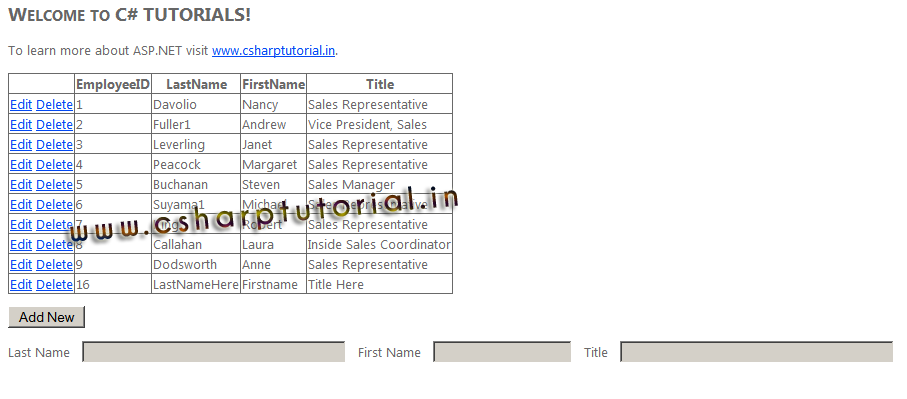
- Now we are done with Update, delete and insert in Gridview. Execute the application by pressing F5 button and it would show below page.
![Gridview - Insert Update Delete Gridview - Insert Update Delete final page.]()
Gridview - Insert Update Delete
Following articles might be of your interest
